The Fire Ring Overhead
"Nope, it's not passing over us."
That was my initial assessment after checking (and misreading) the Eclipse Guide app on my iPad Pro. Fortunately, my wife Pat had looked on the web and discovered that yes, the eclipse would pass right over Albuquerque. Once I figured out what Eclipse Guide was really telling me, I realized, yes, it would pass right overhead. (Lesson - listen to your wife.)
So with four days to go, the race was on.
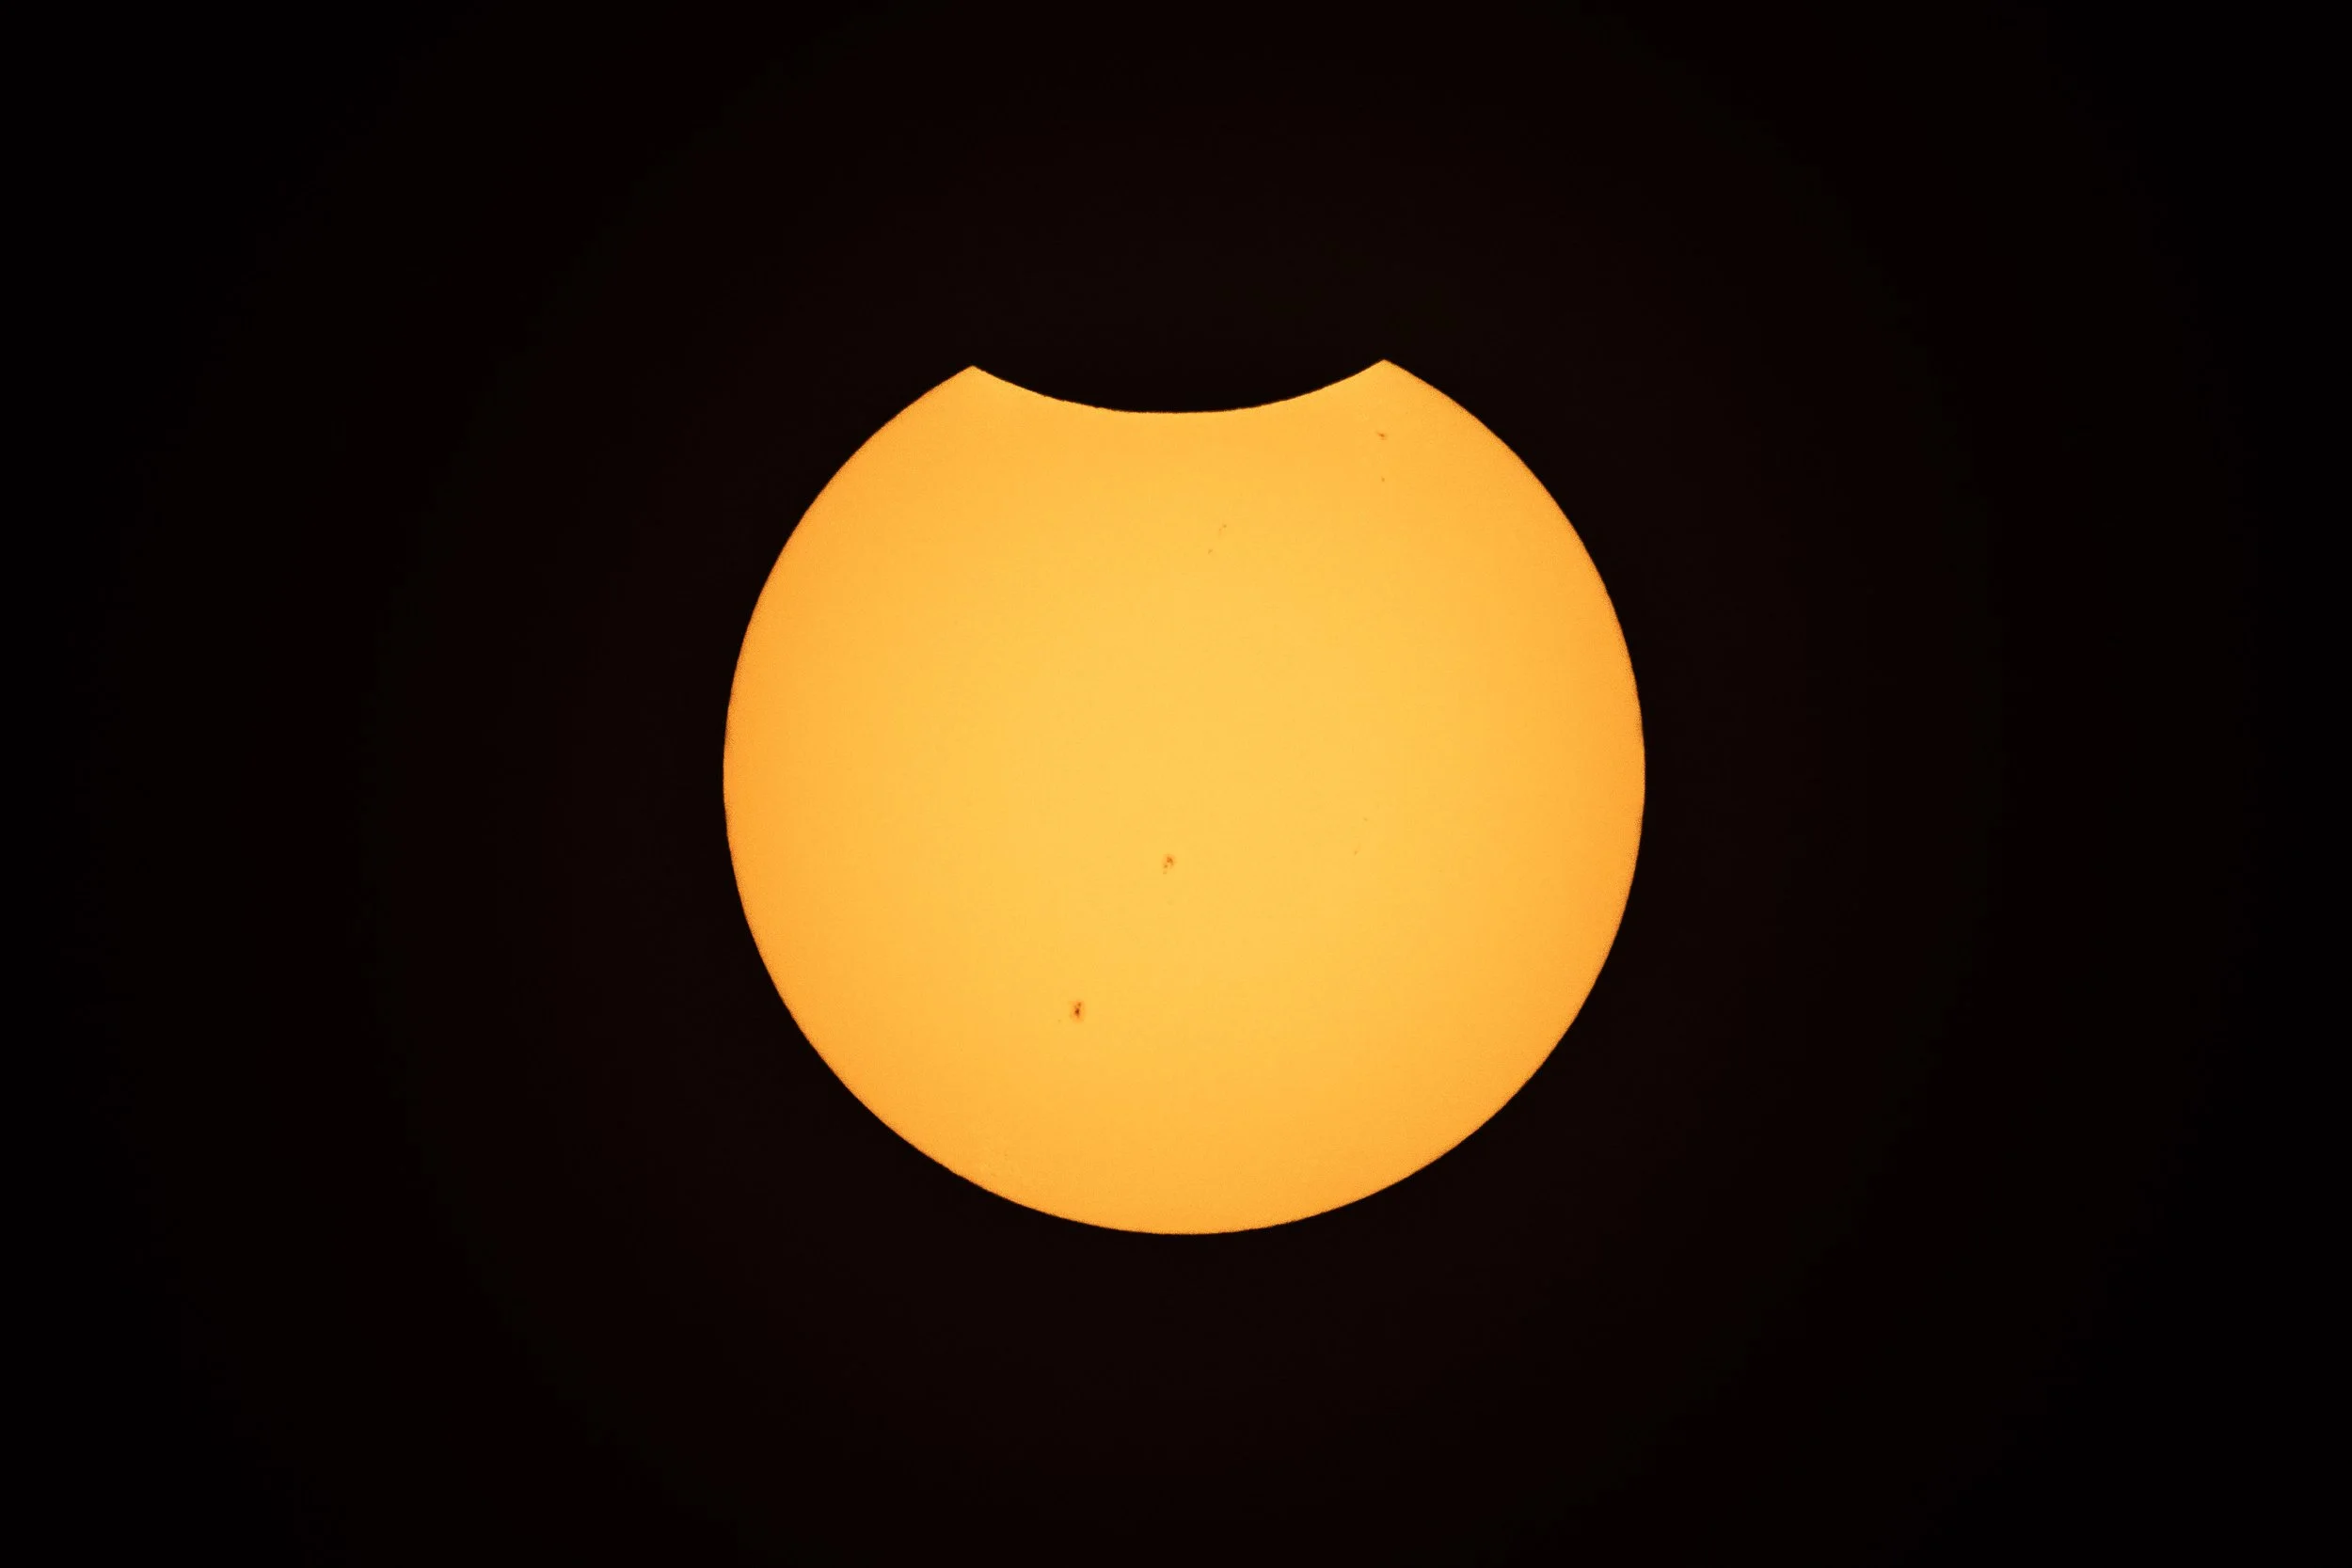
Full sun
Gear Needs - And Where Did I Put That Stuff?
I already had most of what I needed. But the trick was finding it.
First off, you can't just point your lens at the sun and shoot. You'll fry your camera, your eyes, and potentially your lens too. You'll need a special solar filter over the front element of your lens to protect everything. You'll also need solar filter glasses to look at the sun with your eyes.
DISCLAIMER - Do NOT attempt to look at the sun unless you’re wearing solar filter glasses. Do NOT attempt to photograph the sun unless you have a solar filter over your lens. There, now that the lawyers are satisfied, we can get on with it…
I remembered a box labeled "Eclipse Filters / Glasses" from the August 2017 eclipse. After digging around in our garage, I found it. Along with the Thousand Oaks slip-on solar filter for my big lens, there was a 77mm screw-in solar filter for my wideangle zoom. And there were plenty of eclipse glasses. Perfect!
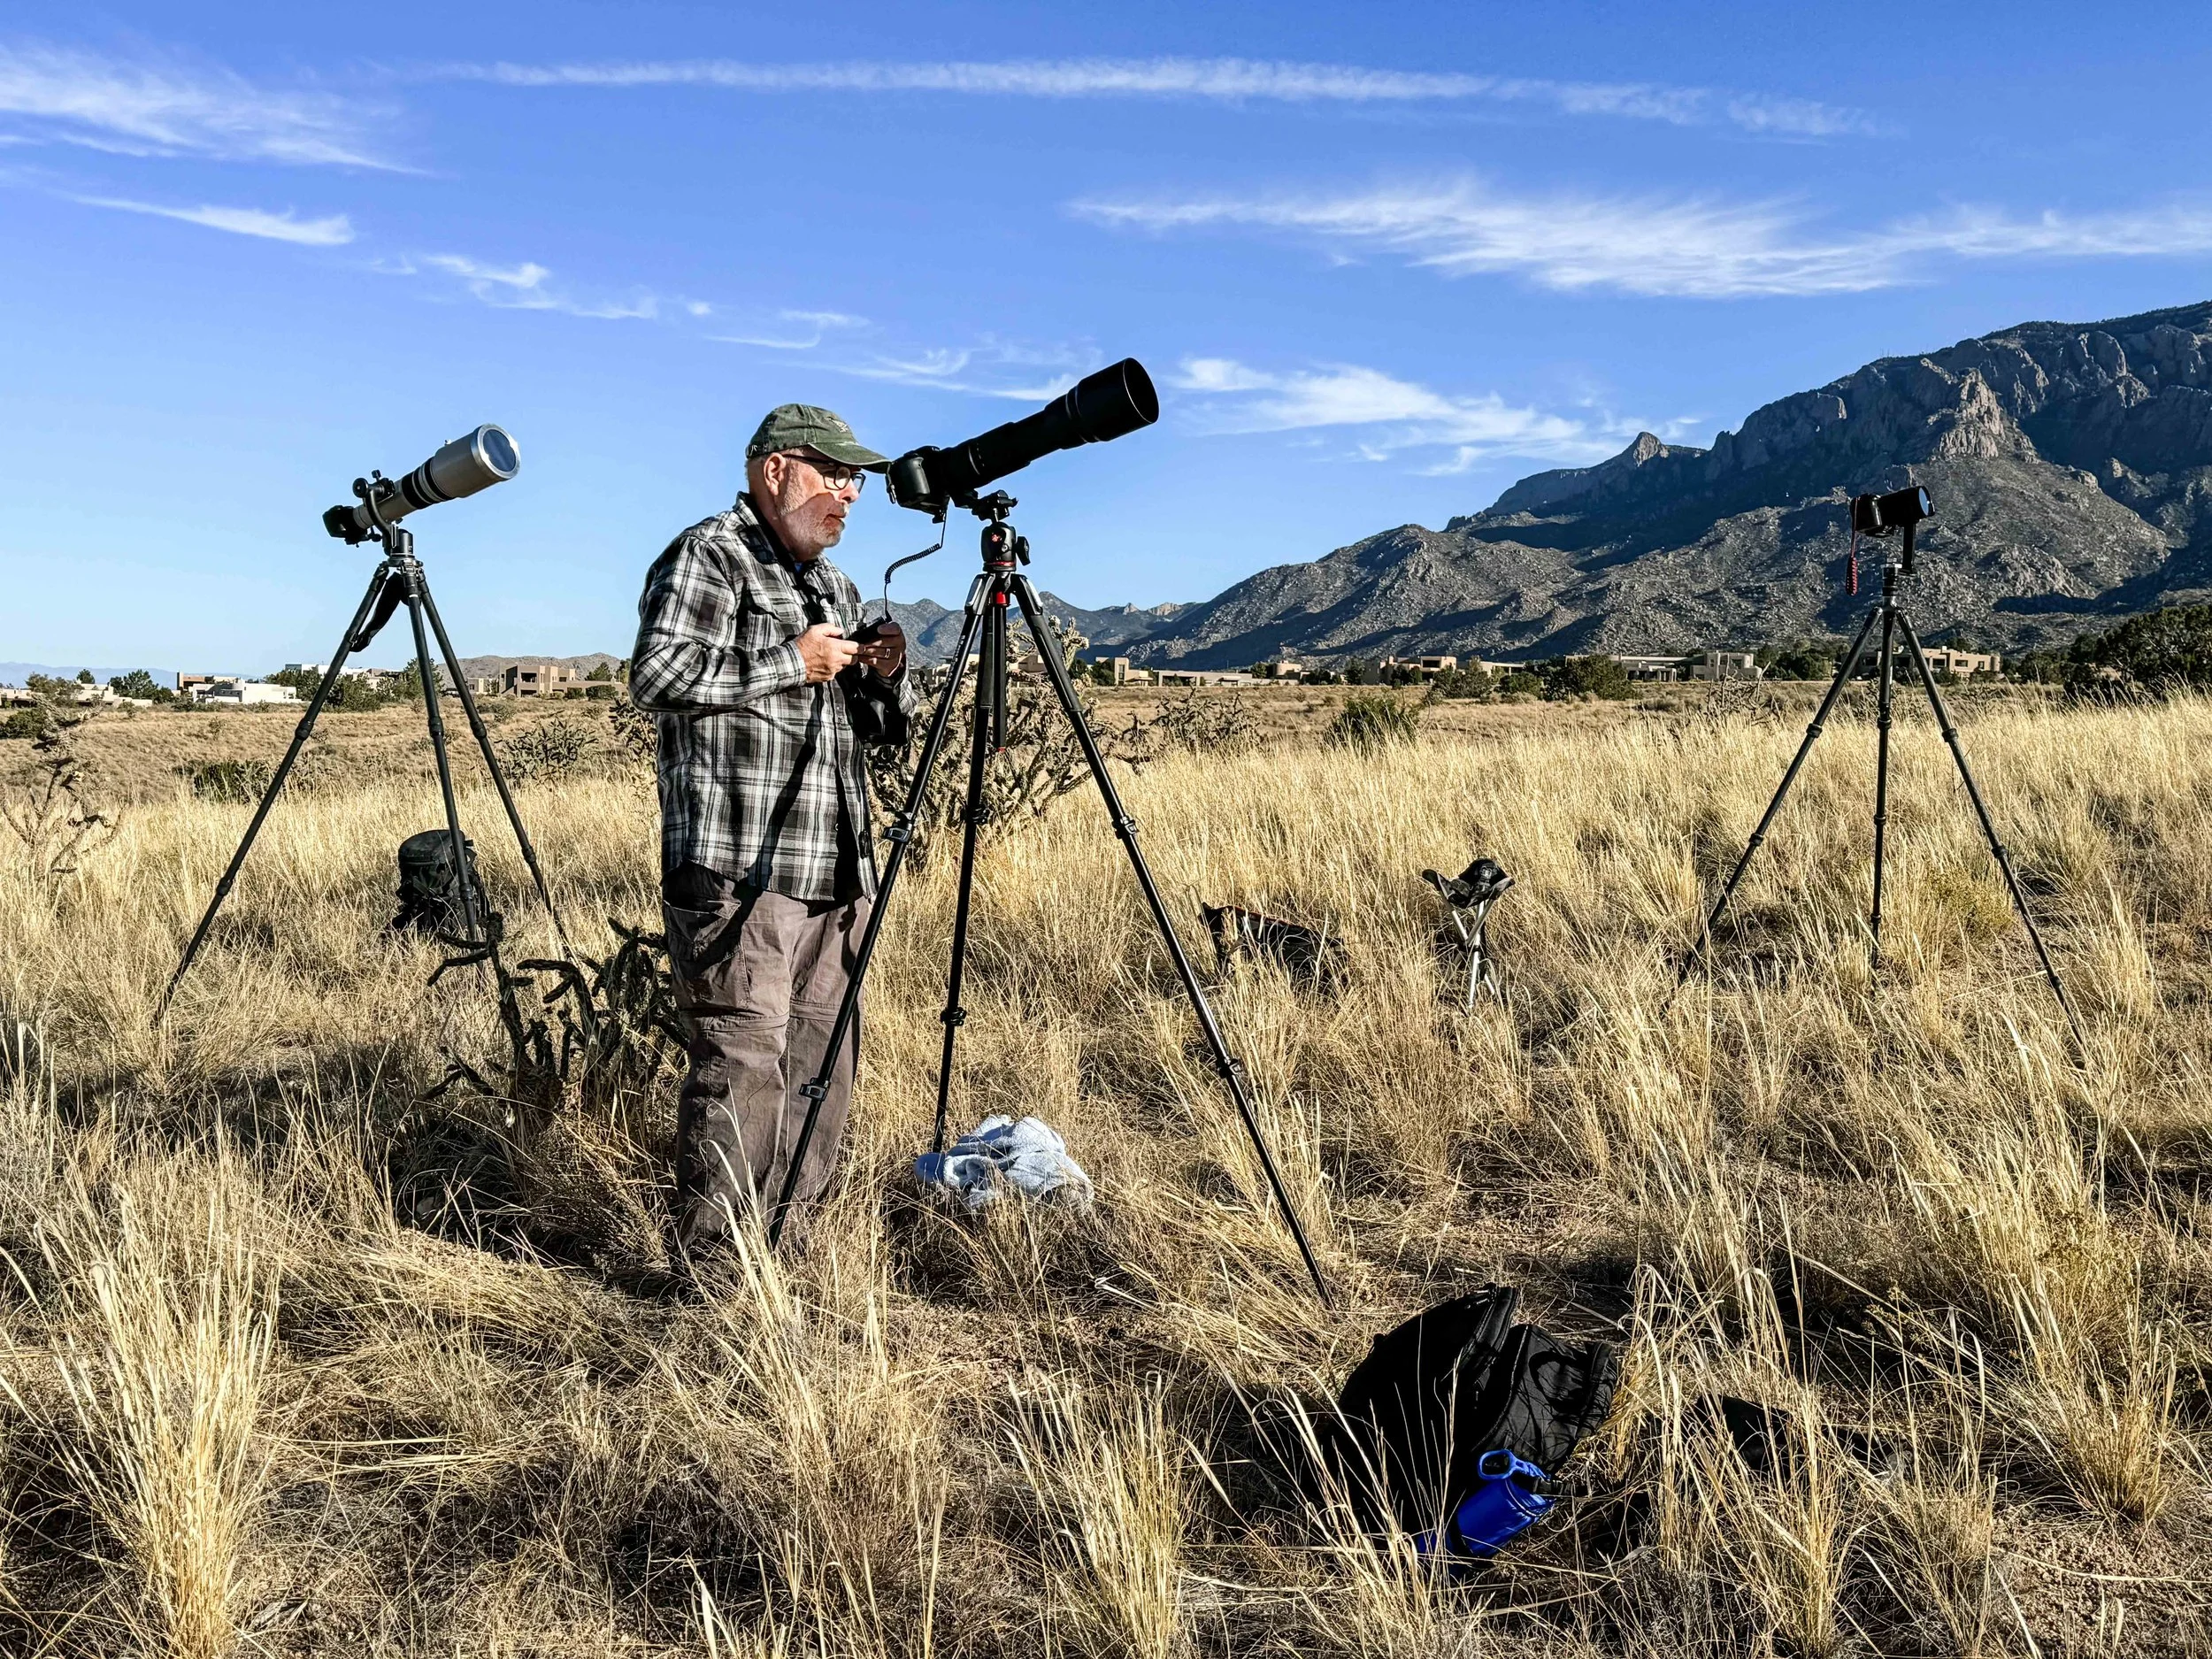
Long lens setup with solar filter
Here’s the Big Lens, But - That Camera Doesn't Work Anymore...
I planned to use my big Canon EF 500mm f/4L IS lens and EF 1.4X II teleconverter combination again for the "large sun" shots. I had the big lens from shooting wildlife in the 2000s. But my Canon EOS camera situation has changed in 6 years. The EOS 7D crop-sensor dSLR camera I used for the August 2017 eclipse wasn't working - sticking shutter. And it had only 18MP resolution, so cropping from it was iffy anyway. I have a 45MP EOS R5, but that's a full-frame camera. That meant no effective magnification a crop sensor gives, and a lot of thrown-away pixels once I did the inevitable cropping in Adobe Lightroom Classic afterwards. Usable, but not ideal.
I'd been thinking about buying one anyway, so I purchased a small and light EOS R7. Amazingly, Amazon delivered it overnight for no extra shipping charge, so I had it in hand two days before the eclipse. (Prime membership pays.) This is a 32MP crop-sensor mirrorless camera. With that many pixels to play with, there’s still plenty of detail resolution after still-necessary but minimized cropping in Lightroom.
The R7's 1.6X crop factor with the 500mm lens and 1.4X teleconverter gives a full-frame equivalent lens of 500 * 1.4 * 1.6 = 1120mm. That's a huge telephoto with a 2 degree angle of view. That narrow angle renders the sun fairly large.
I've dropped gear, and had it stop working unexpectedly, so I'd be bringing an RF 100-400mm f/5.6-8 telephoto zoom backup and the EOS R5 just in case. An eclipse is a one-time event, so you have to get it the first time.
Gear weight - It's... So... Heavy...
I've had problems with my back, knees and ankles in the last couple years. That's one reason I switched to very lightweight Micro Four Thirds equipment for most of my photography a couple years ago. But my Micro Four Thirds cameras have half-size sensors with just 20MP resolution. That meant not many pixels for cropping if I wanted acceptable resolution. Since I wouldn't be carrying anything very far and I was getting carrying help from my wife, we could handle heavier equipment. This one time.
And how much weight were we talking about? At 1.3 pounds, the R7 camera has the same light weight as my Micro Four Thirds cameras. The R5 is a bit more at 1.6 pounds. But the big EF 500mm f/4L IS lens is a boat anchor at around 9 1/2 pounds. And the RF 14-35mm f/4L and RF 100-400/5.6-8 IS lenses together weigh 2.6 pounds. The pack with the EOS R5, RF 14-35mm f/4L IS (for a full-sky time-lapse composite - see below), RF 100-400mm f/5.6-8 IS telephoto zoom, solar filters and smaller Gitzo tripod with RRS gimbal weighed 15 pounds. The larger long lens pack with the EOS R7, EF 500mm f/4L IS, EF 1.4X II, and EF-R mount converter weighed 16 pounds. The big Gitzo tripod and Wimberley Sidekick gimbal on Arca-Swiss B2 head weighed another 7 1/2 pounds. So I wasn't exactly traveling light.
A neighborhood friend setting up off the Michial Emory Trail, Albuquerque
So Where Are We Going?
Since we hike trails in Albuquerque's Sandia foothills every day with our dogs, I had an idea of where I wanted to go. I wanted a wideangle timelapse against background mountains, so I needed a separate full-frame camera and wideangle lens on a second tripod and a suitable location. After a short scouting hike the day before the eclipse, we found a spot off the Michial Emory Trail, one of the nearby trails we hike often. It was just 1/3 mile from the trailhead / parking lot over mostly level terrain (2/3 mile round trip), so I could handle carrying 15-16 pounds. And I had a southern arm of the Sandias for a background.
The one thing we weren't sure of was how many other people would be there. For the August 2017 total solar eclipse, our site near the Mormon Temple in Rexburg, Idaho was a mob scene. And the traffic jam heading out of Idaho to Wyoming afterwards was horrendous.
Turned out we needn't have worried. There was plenty of parking when we arrived a little before 8 o'clock. A photographer friend from my neighborhood was already there with his gear, so we mounted up and walked to our site.
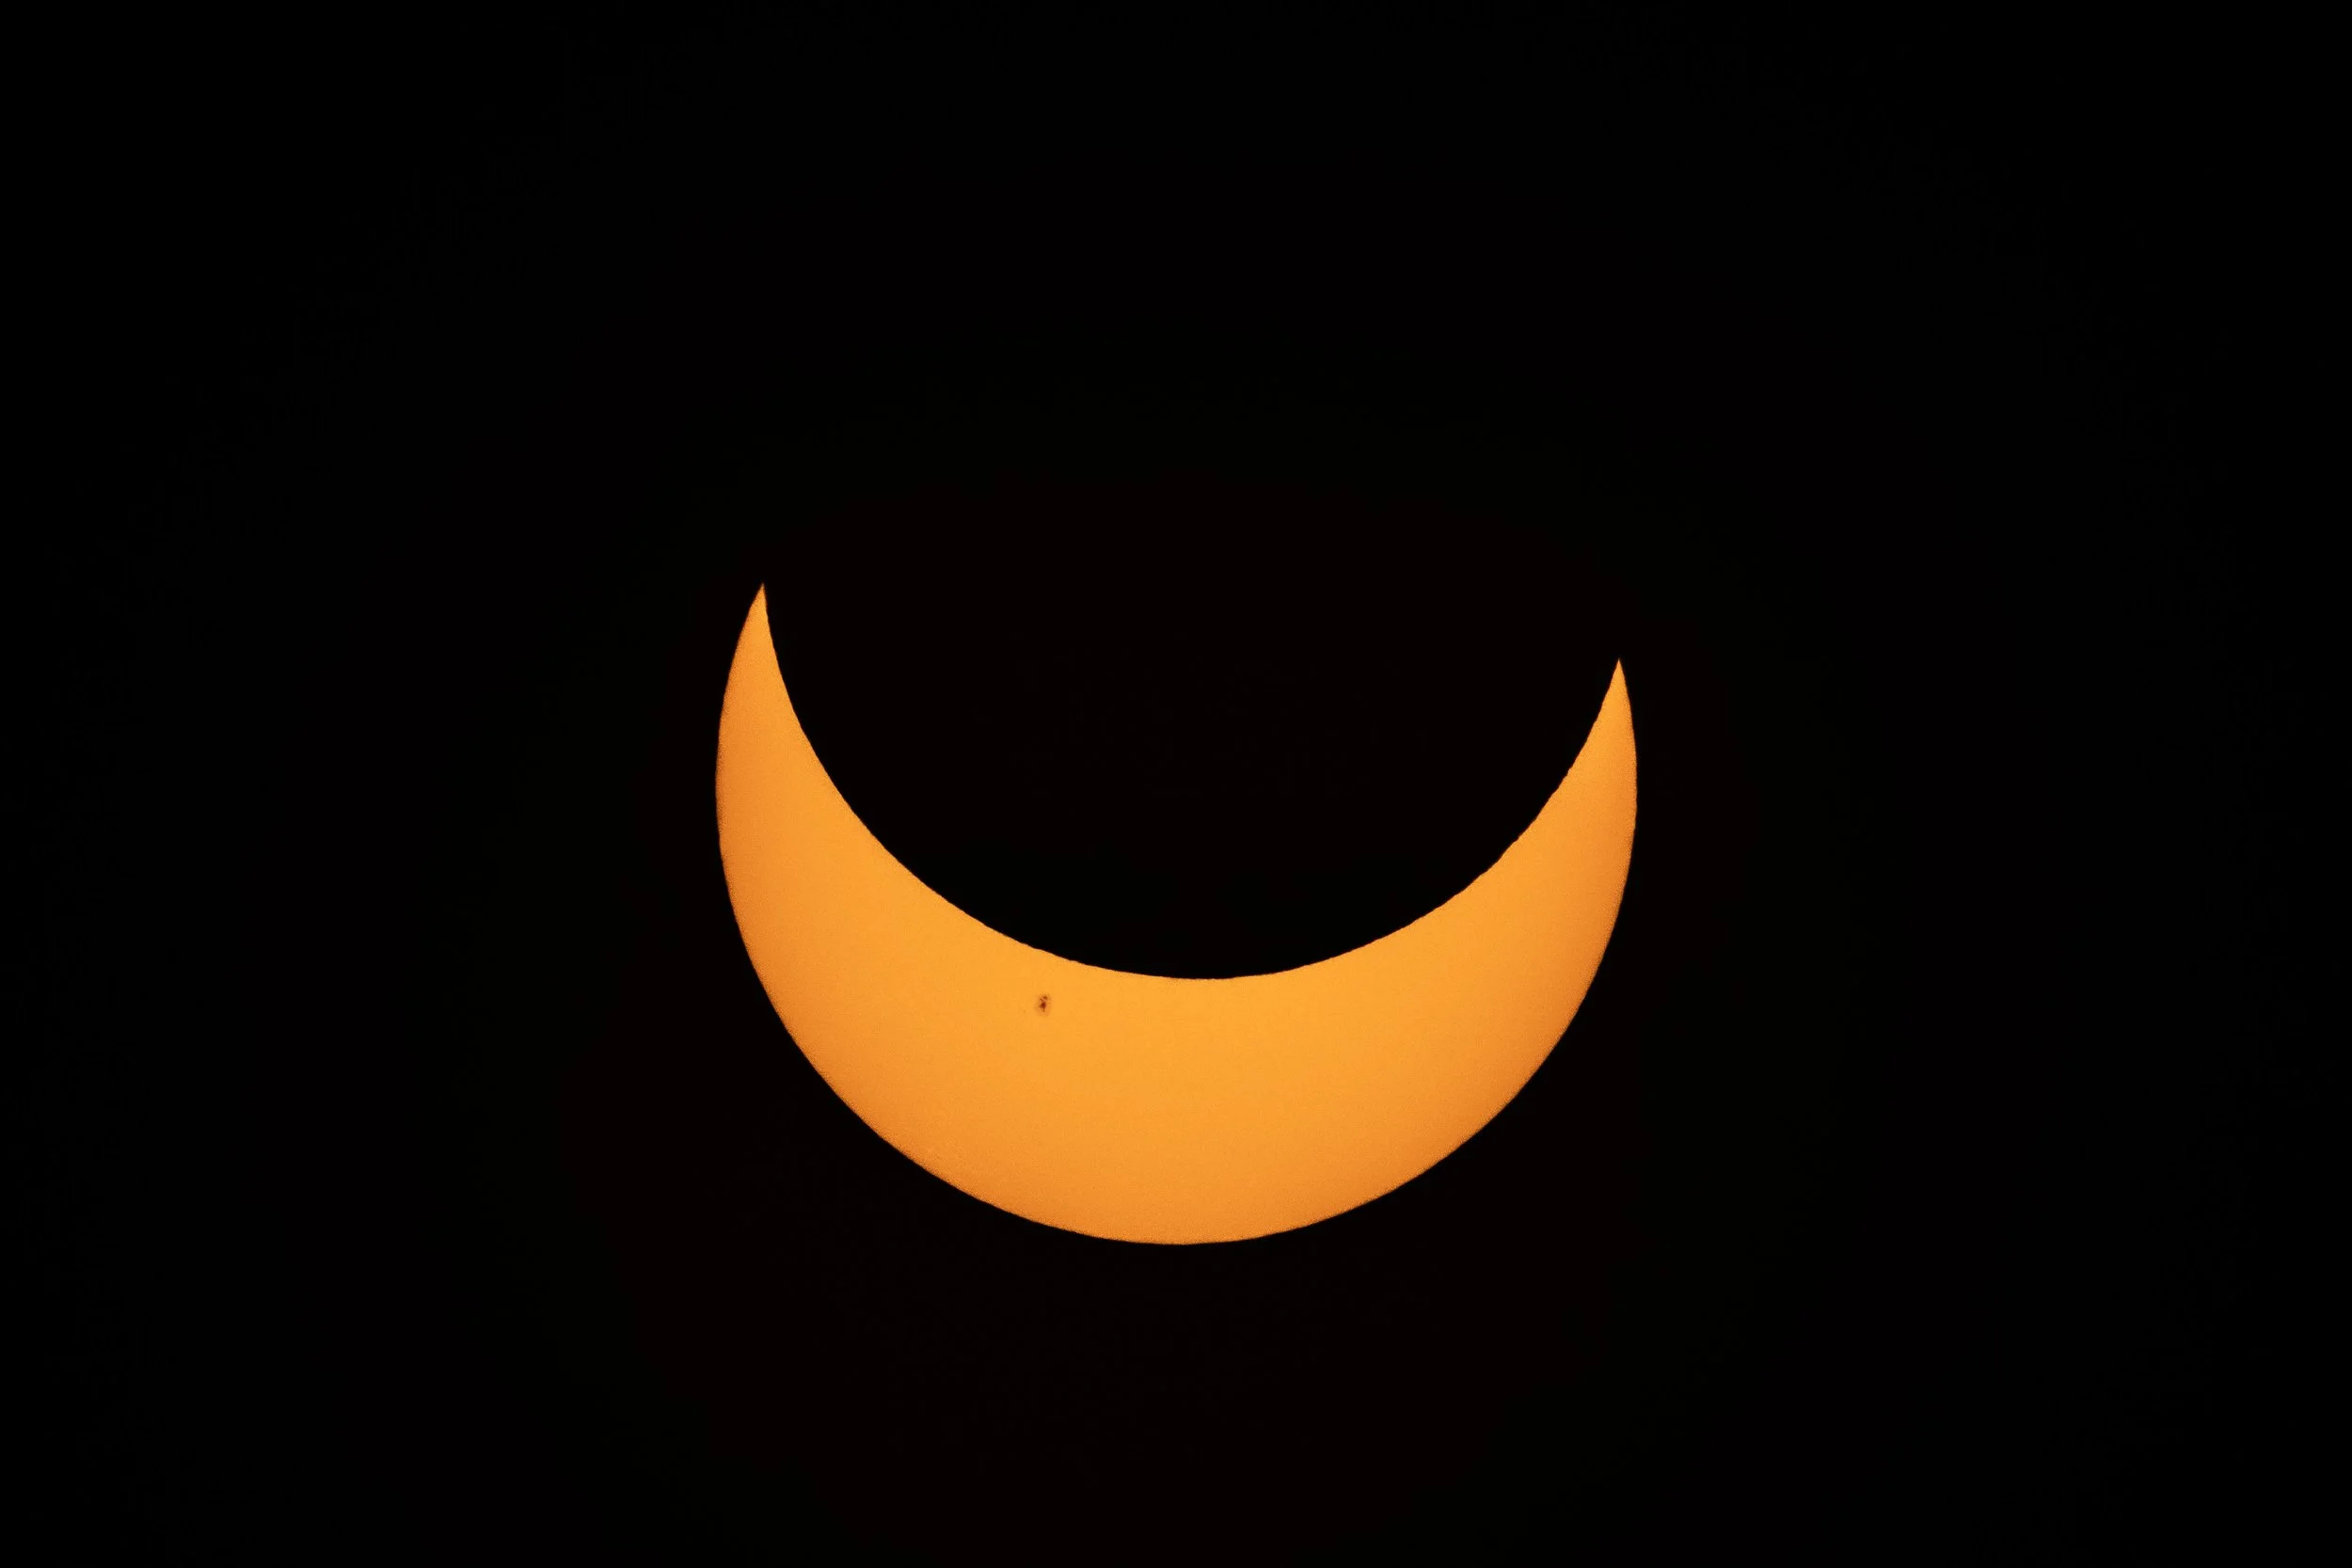
Initial munch
How To Shoot An Eclipse - Stabilization?
Modern cameras and lenses do some weird things when you mount them on old-school tripods. Before 1995, tripods were the only way you guaranteed steady shots, especially with heavy telephoto lenses. Today's digital cameras and lenses have image stabilization built in, so you can be a little shaky with your handheld shot and still get steady, sharp pictures.
A good tripod is a steady platform, without any shake. Trouble is, with perfectly-stable cameras and lenses on a tripod, many stabilization systems jiggle things a little while they try to find and correct for non-existent shakiness. So you need to turn camera IBIS (in-body image stabilization) and lens IS / VR (image stabilization / vibration reduction) off to stop this jiggle on a tripod. (Yes, some of the latest camera and lens stabilization systems detect tripod mounting and patially shut off. But as a former IC designer, I don't 100% trust the hardware and firmware to do this, especially for a one-time event. I know better.)
The other thing you’ll want is a remote trigger. Sure, your cameras are on tripods, but your finger wiggles the camera when you press the shutter button, enough to make things noticeably shaky. This can be wired, with the appropriate connector to work vwith your camera. The major camera manufacturers also make wireless remotes. I had two of Canon’s BR-E1 wireless remotes on hand, so that’s what I used.
Eating the sun
Setting Up and Tracking It
I'd set up and taken a few test shots the day before with both cameras and lenses with filters to make sure everything was working. Since I'd just done it, setup went quickly.
I'm used to sliding the camera-1.4X-500/4L lens combination into the Wimberley Sidekick gimbal head from years of shooting wildlife. Once balanced in the gimbal, I can move that heavy combo around with a fingertip. But I can also tighten it down so it doesn't move, important for tracking and shooting the sun. From prior experience with that lens-crop sensor camera combo, I knew I'd have to change my aim every 30 seconds or so to keep the sun in my viewfinder.
Then I set up the EOS R5 and ultra-wide RF 14-35mm f/4L IS lens on my smaller tripod and lightweight RRS gimbal head. The RRS head's nodal plate let me position the camera's center of gravity at a neutral balance point. I didn't need to track anything with that gimbal, since the goal was a timelape sequence showing the sun's motion as the eclipse progressed. But having camera motion restricted to a couple planes of motion meant easier adjustments than using an infinitely adjustable ball head.
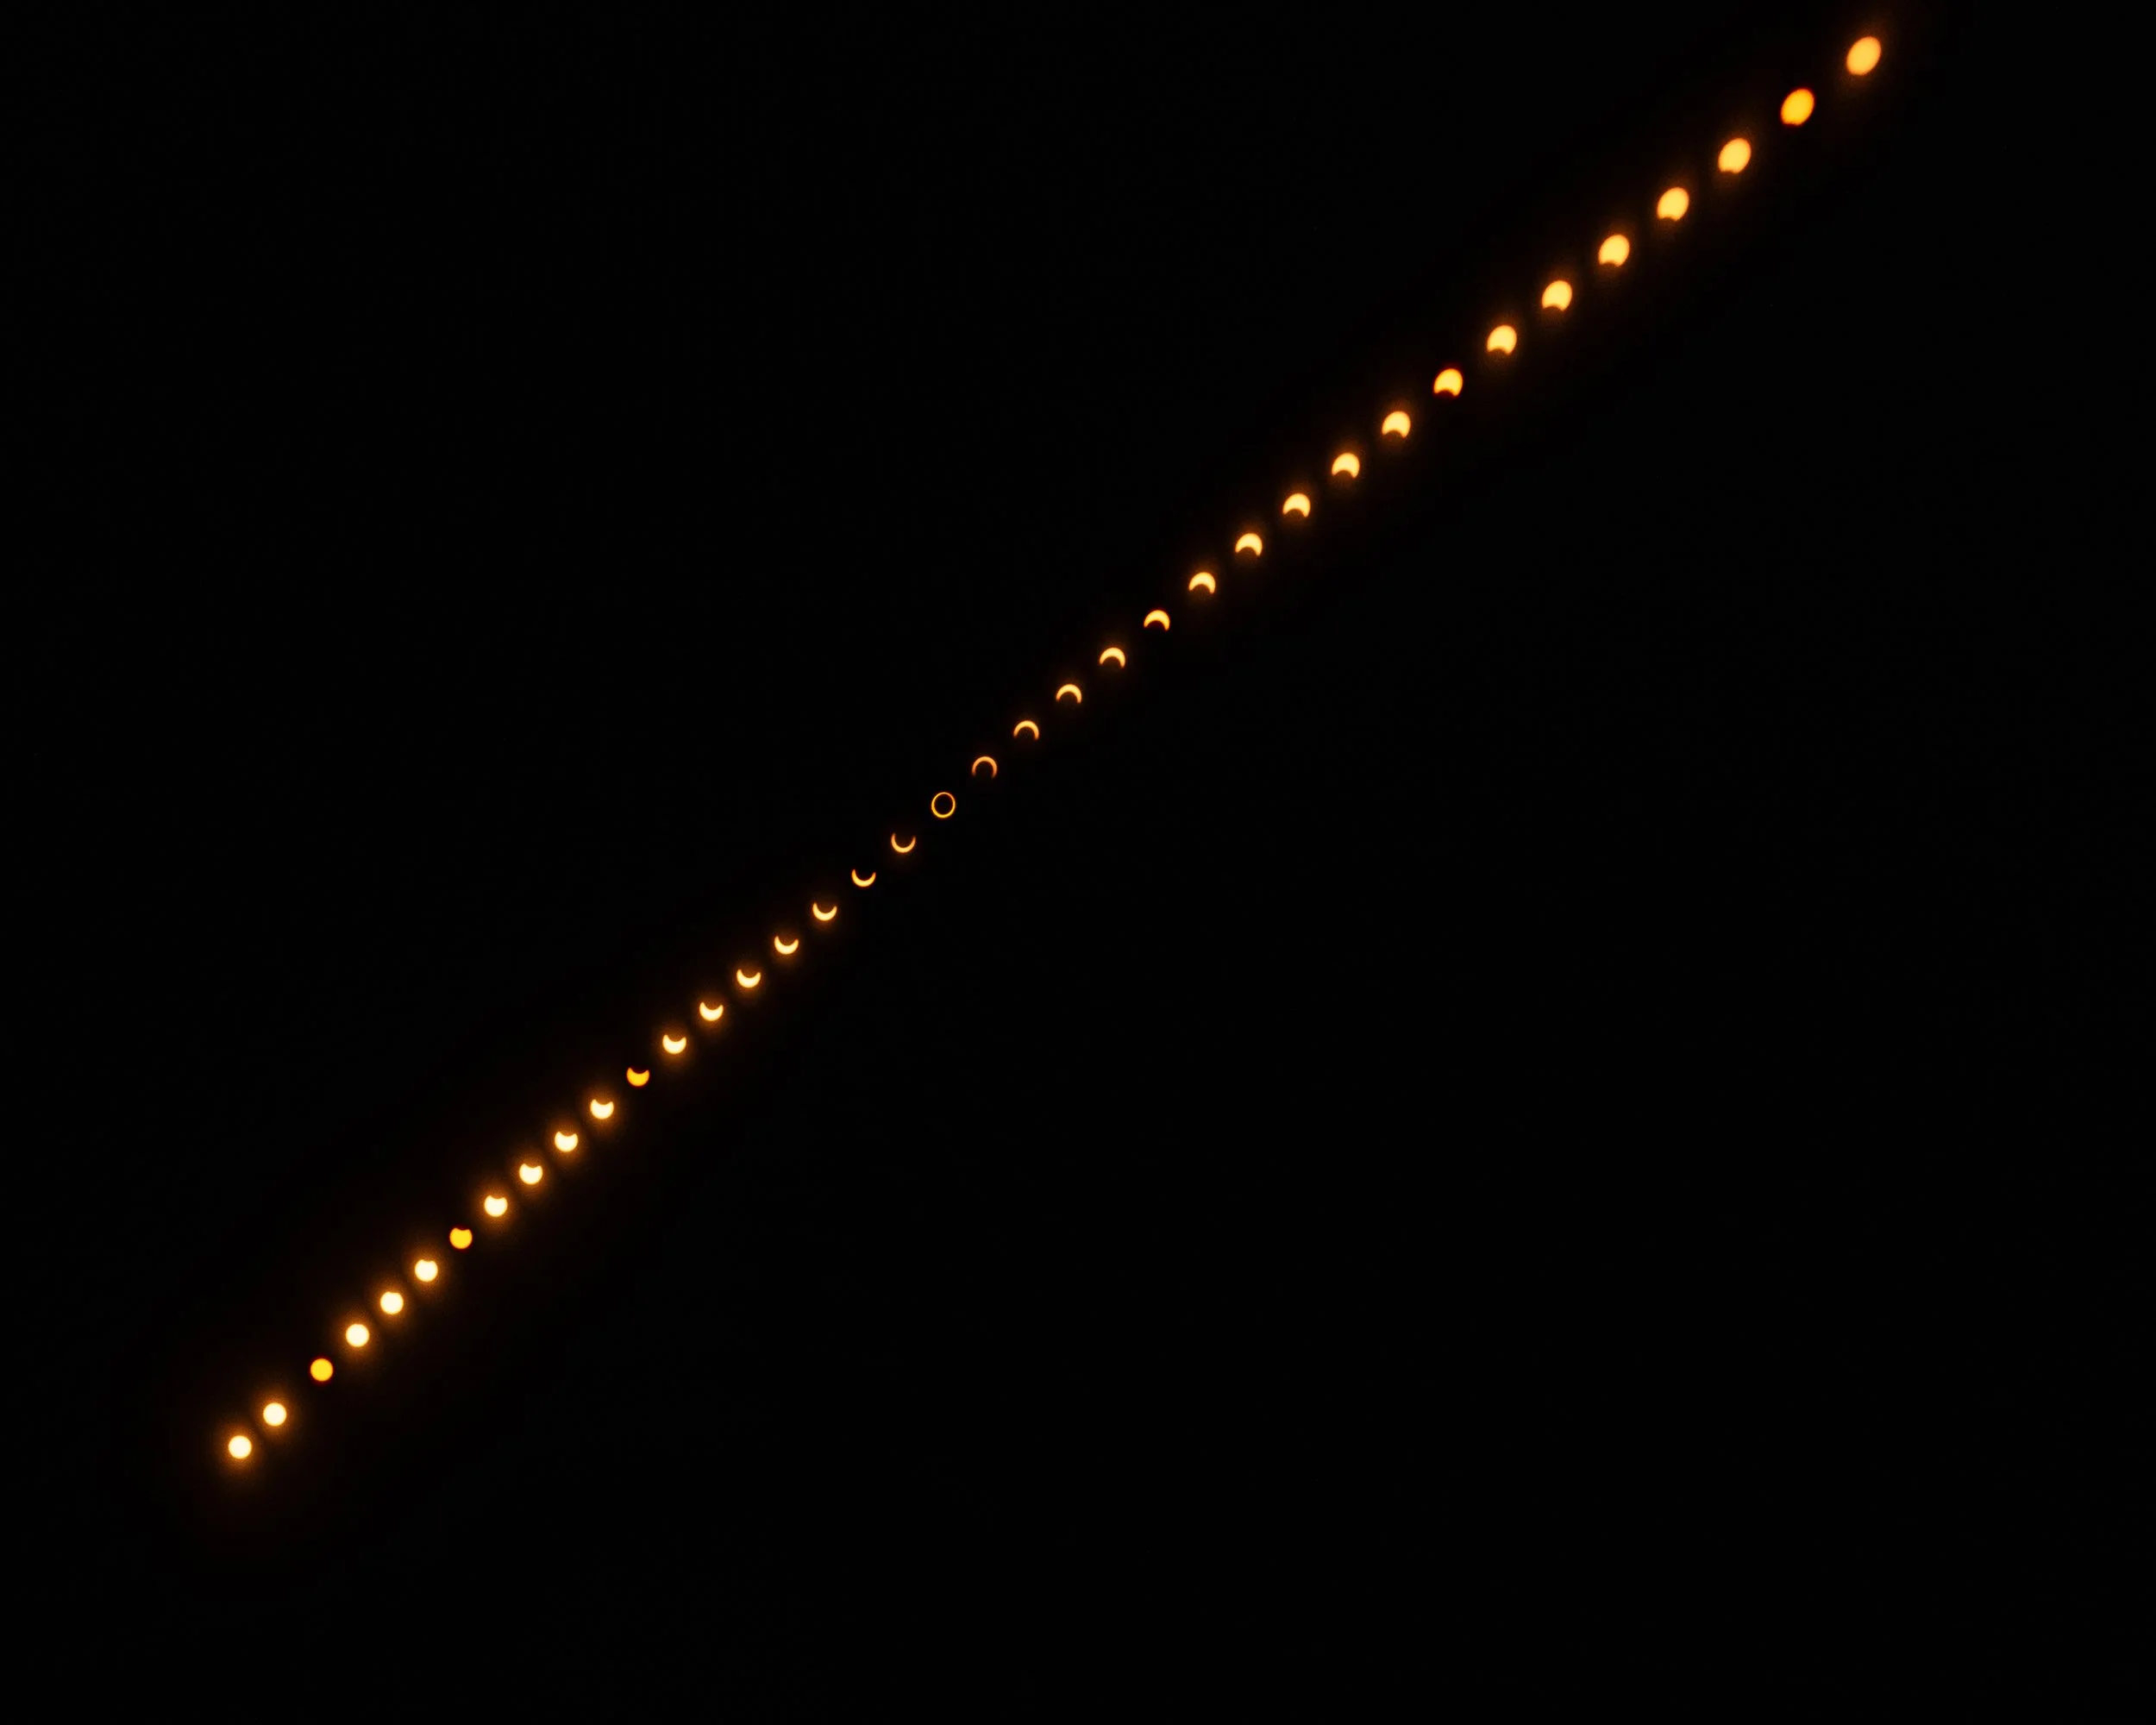
Canon's R-series cameras have interval-timed shooting capability built in, so I chose a 5 minute shooting interval with 36 total shots. I figured 3 hours of shooting for the entire eclipse event would be plenty.
Getting close…
Where Is Everybody?
We'd arrived an hour before the eclipse start. I'd expected large crowds for this one, especially since it was International Balloon Fiesta week in Albuquerque. But only a few small groups appeared on the trails, and my neighbor and I were the only folks with big lens and tripod setups.
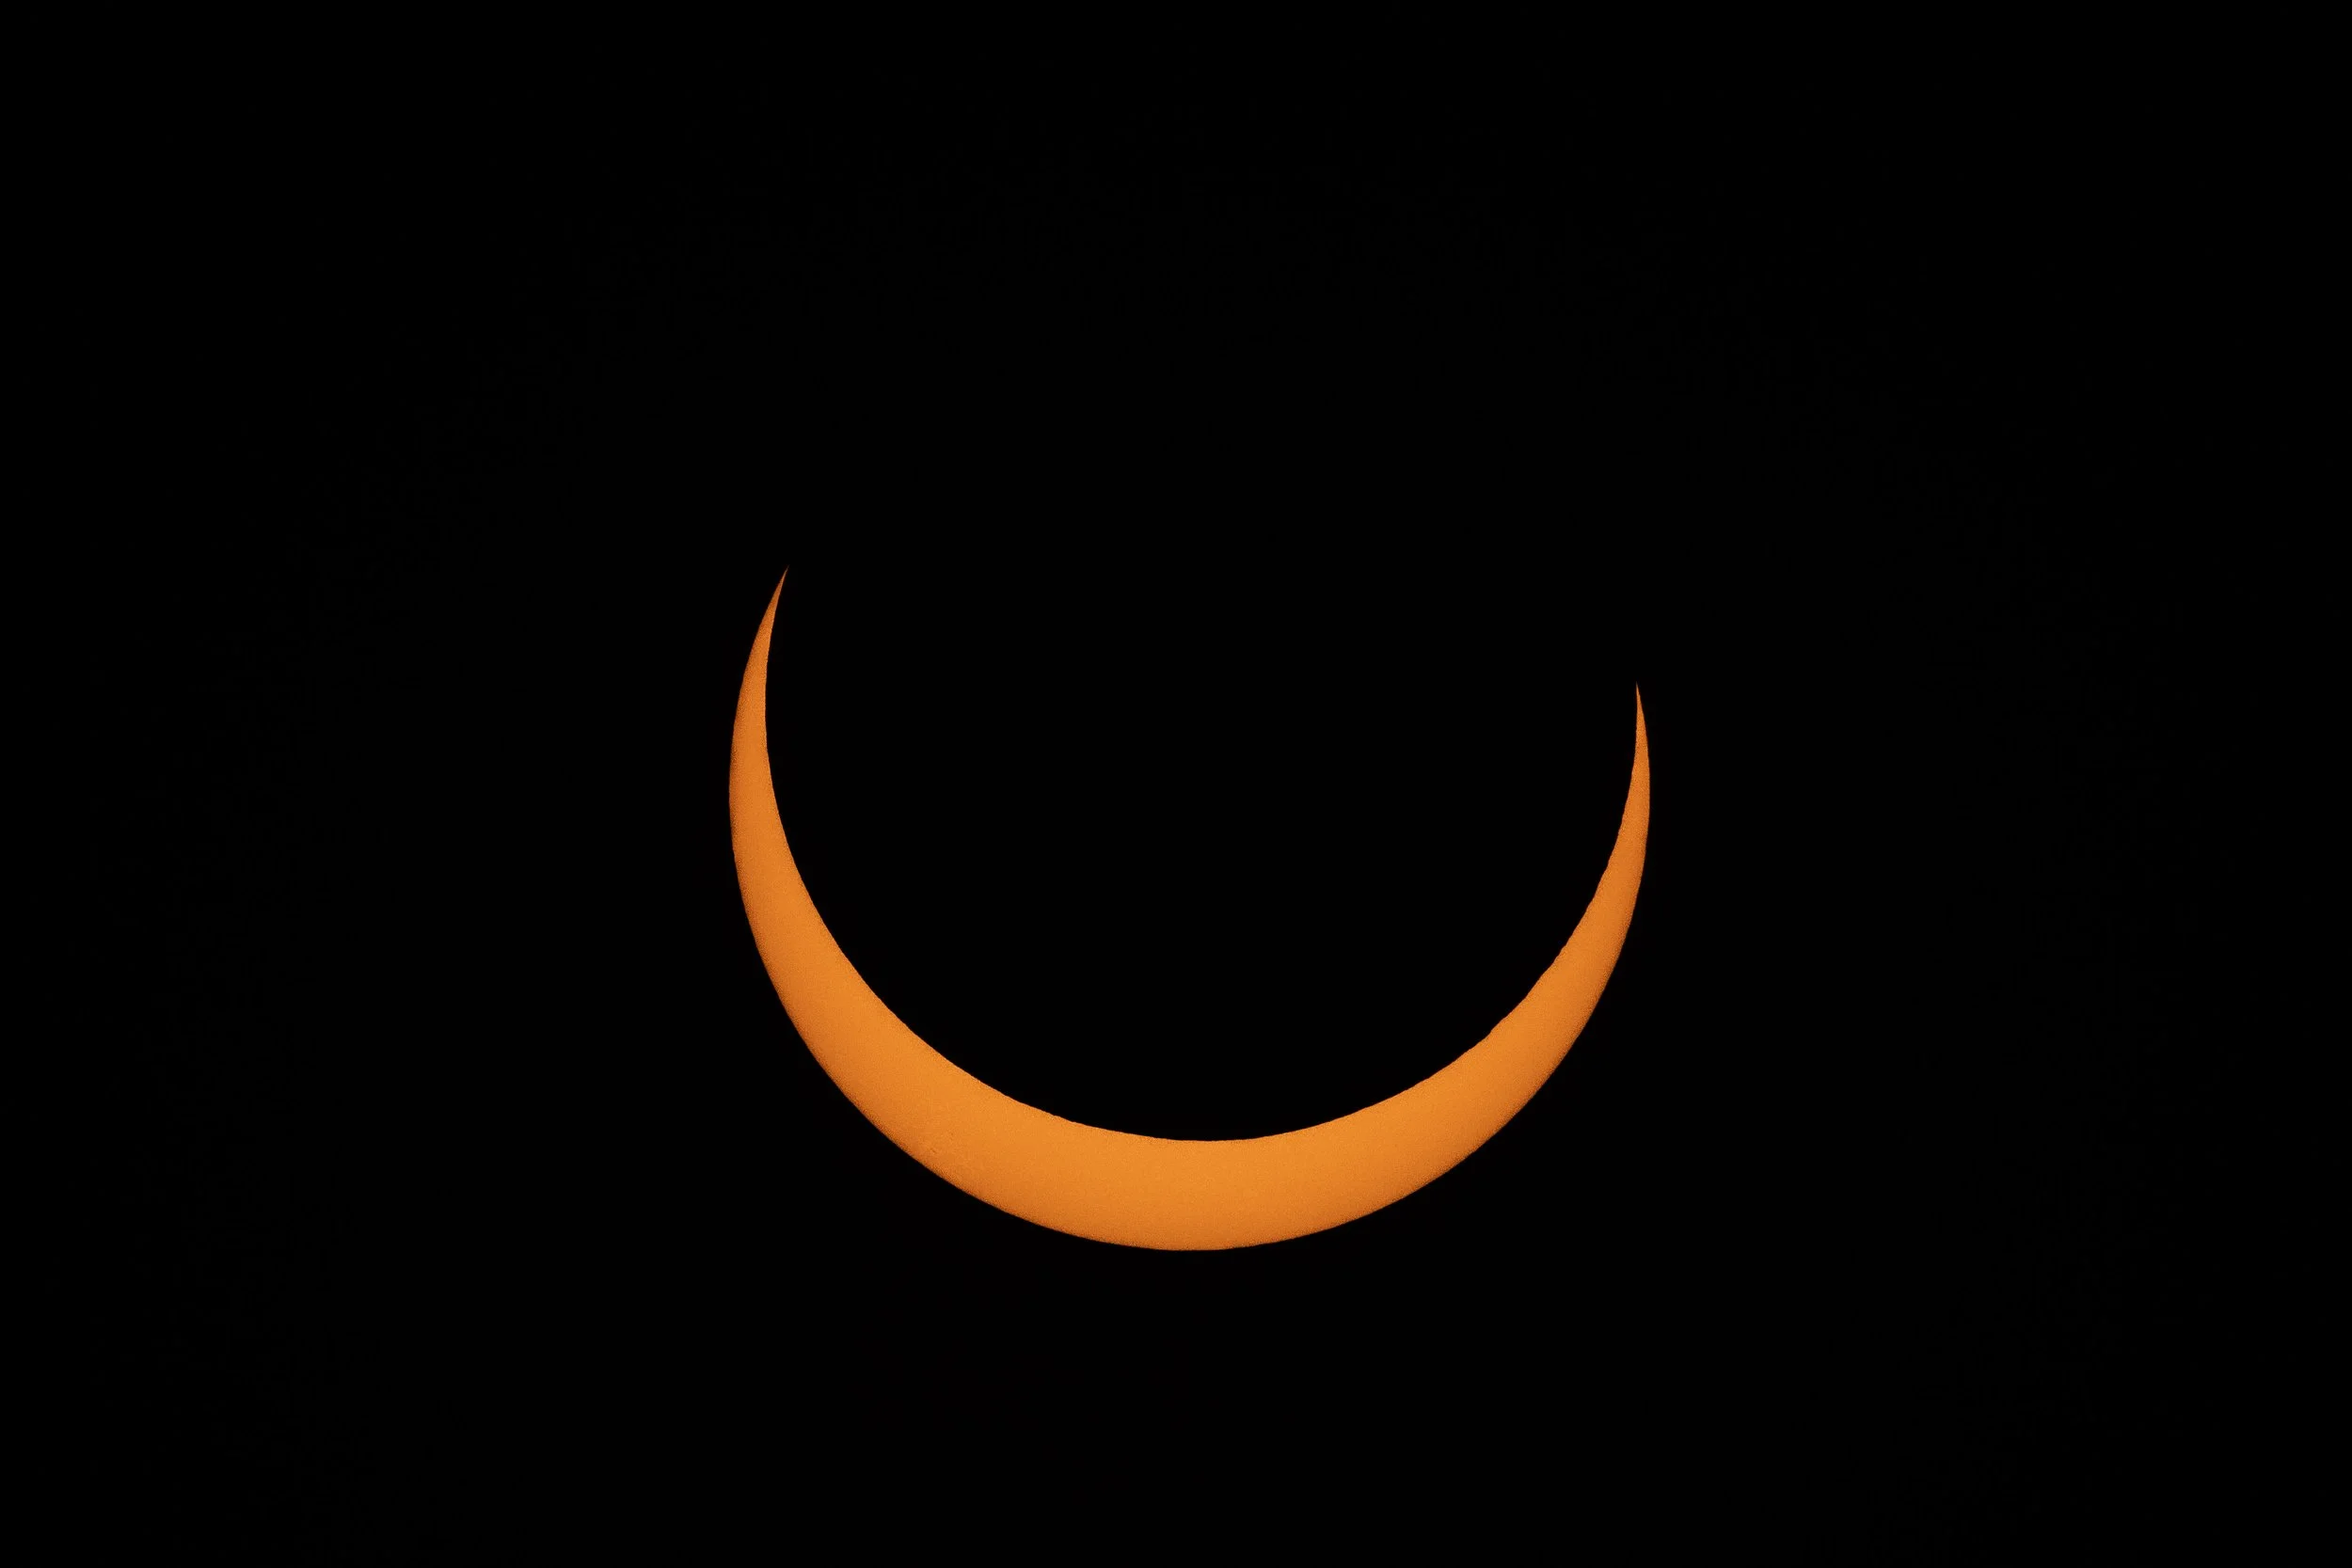
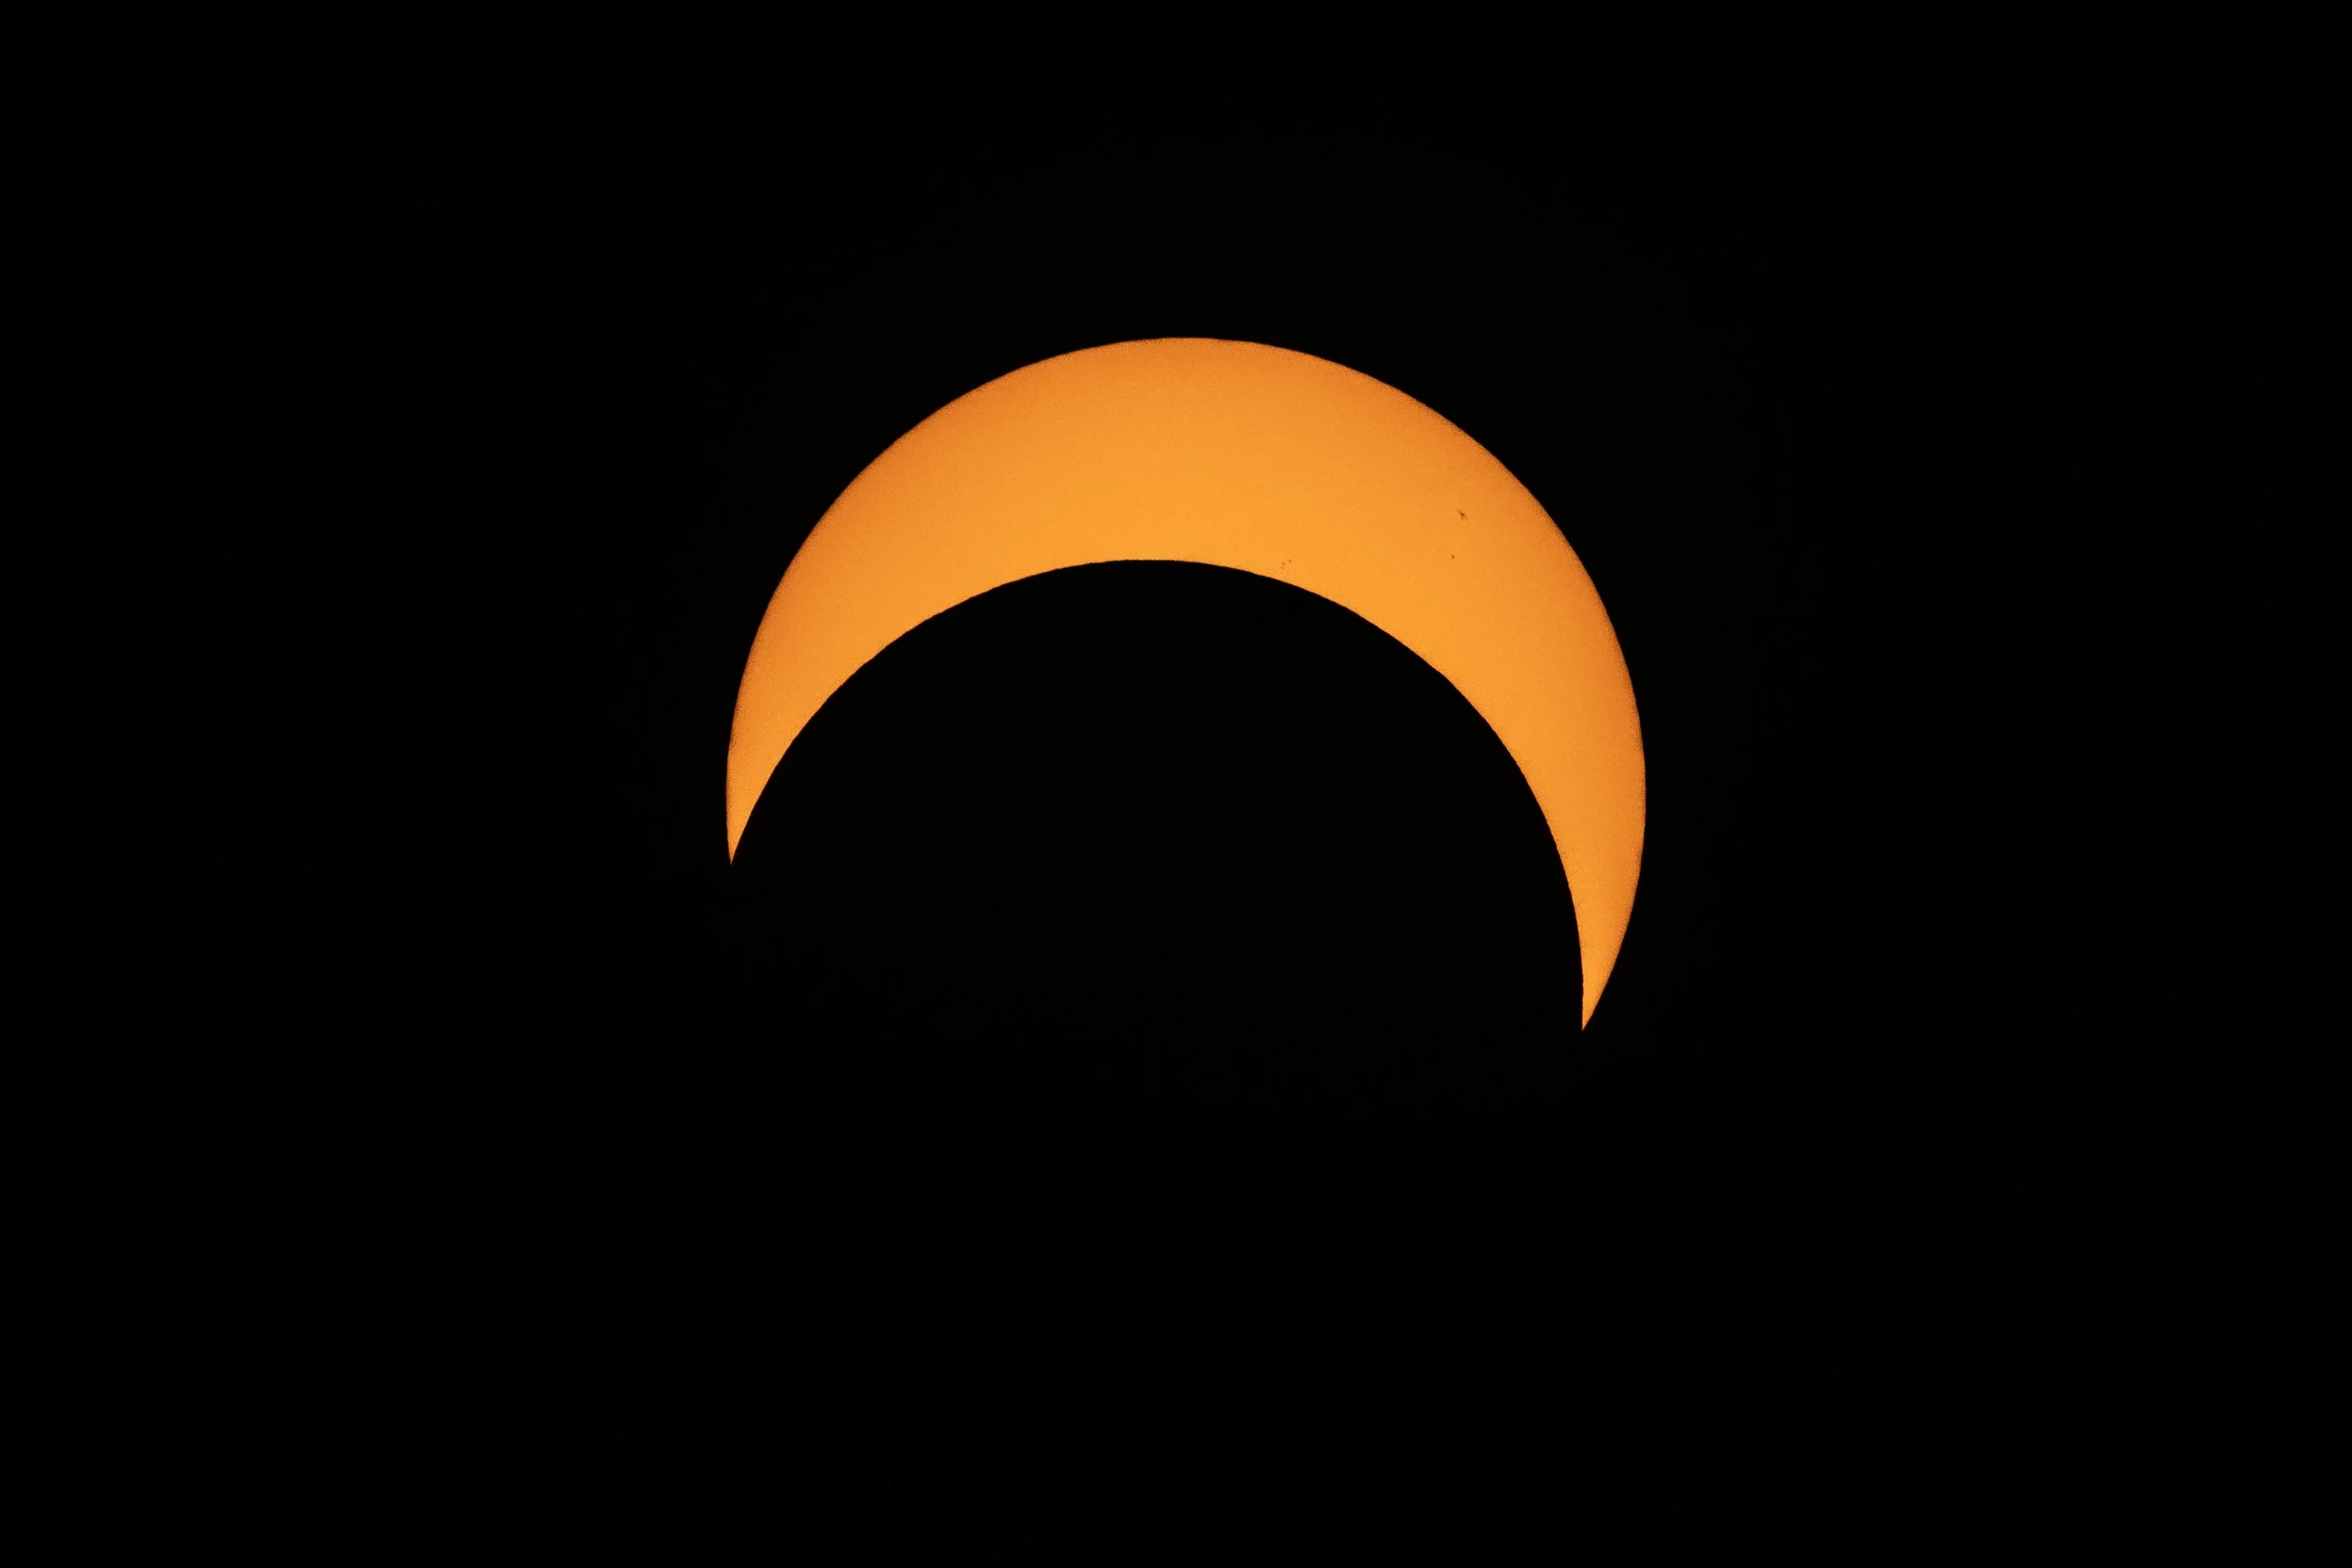
The eclipse began right on time at 9:13 AM. First we saw a small semicircular munch out of the top of the sun. More and more got eaten up until all you saw was an orange ring at 10:37. Then the moon moved down, revealing more and more of the sun until the entire disk showed again at 12:09 PM. There were a few sunspots visible at the beginning, and they'd rotated slightly around by the end.
I didn't hear the timelapse camera's shutter after I triggered it and the eclipse began. I'd checked it a few times to see that it was still running. It indicated that by flashing TIMER on the rear LCD screen. I shot an extra frame at eclipse maximum / ring of fire to make sure I got that. Then I stopped it at 12:09, when the eclipse ended.
Leaving Rexburg, Idaho after the 2017 solar eclipse injected us into a miles-long traffic jam into Wyoming. This time, though, driving back to our house was routine.
Ring of Fire
Post Processing Surprises
I was most interested in the telephoto shots, the closeups of the eclipsing sun. Those turned out very well, with sunspots clearly visible and hints of the lunar limb’s jagged edge. I'd expected to do some cropping. I'd started with the exposure I'd used with similar equipment in 2017. I'd done some chimping to be sure the big lens and camera were giving me proper exposure, and also because it was fun to see the sun from a close perspective. I'd only checked the time lapse camera for the flashing TIMER indication, and casually for its recording of a tiny sun in a wideangle view.
So I had a great series of closeup shots showing the sun disappearing into a ring, then reappearing. But when I looked at the wideangle sequence, I discovered that as the sun moved towards the upper right of the frame, my lens distorted its roundness into a squashed diagonal oval. This is either comatic distortion (coma for short) or astigmatism (or both), especially a problem with night sky photography. In extreme cases, it makes what should be pinpoint stars into flattened batwings. I knew about this zoom's uncorrected barrel distortion at short focal lengths - you need to use Canon's correction profile for it in post-processing - but no reviews mentioned coma. Like a GI running into booby traps in southeast Asia, I fell right into that one. An f/4 lens isn't really fast enough for night sky photography, so no one had tested the RF 14-35mm f/4L IS for coma / astigmatism. But boy, I found it!
Distorted in the corner - annular eclipse wide composite
When all was said and done, though, I was very happy with the closeup eclipse sequence. And it had been another nice outdoor party for everyone. I'm looking forward to the next total solar eclipse on April 8, 2024.
Shot Notes
That I got astigmatized corner detail is my own fault. Before the next sky shoot with important corner and edge detail, I'll actually take a set of pictures using the entire time-lapse process and check them. I’ll likely use a different lens, possibly a wide-angle prime. Primes are usually better-corrected than zooms.
I'm also thinking about lighter-weight equipment. My 20-year old 500mm f/4 prime lens is very sharp - the differences between its rendering and that of its replacements is for my purposes negligible.
Reappearance
But 500mm and 600mm f/4 prime lenses weigh at least 9 1/2 pounds (and usually more today), aside from being very expensive. There are some lighter, less expensive zoom options reaching out to 500mm and 600mm. Sigma makes a 150-600mm f/5-6.3 lens. That becomes a 240-960mm equivalent on the crop-sensor EOS R7. A 1.4X teleconverter boosts the reach to 1344mm, for completely frame-filling shots of the sun.
However, to capture the sun's full corona at totality and some blackness around that, 700mm on a crop-sensor camera is about as much as you'd want. That's 1.4X*500mm. So Canon's RF 100-500mm f/7.1L IS makes more sense. That lens weighs just 3 pounds.
Sun’s almost back
But using an RF 1.4X teleconverter with it gives you reach to 700mm, but at f/10. Yes, modern mirrorless cameras can autofocus at that aperture (and I'll be manually focusing for an eclipse anyway). And the exposure I was using for the big lens plus solar filter shots of the annular eclipse was 1/320 sec at f/10 and ISO 1250.
Total Solar Eclipse composite from August 2017
For the solar eclipse of August 21, 2017, for some reason I used 1/4000 sec at f/8 and ISO 3200 for totality. I could have used 1/900 sec at f/10 and ISO 1250, and had the same amount of light on the sensor. A lower ISO would also have been less noisy and would have revealed more detail.
Fred Espenak's MrEclipse.com website suggests I could start with ISO 1250 and f/10, then run my shutter speeds from 1/2000 sec to 1/2 sec to capture corona out to an 8-sun radius for a composite. That's probably what I'll rehearse for and do.
Thanks to my wife Pat G, without whom none of this would be possible.
More Information
1. NASA (nd), 2023 Annular Eclipse: Where & When. Retrieved from https://science.nasa.gov/eclipses/future-eclipses/eclipse-2023/where-when/
2. Jay Anderson (September 1, 2023), TOTAL SOLAR ECLIPSE APRIL 8, 2024. Retrieved from https://eclipsophile.com/2024tse/
3. Dan Zafra (2023), BENRO POLARIS REVIEW IN 2023 – THE MOST COMPLETE STAR TRACKER. Retrieved from https://capturetheatlas.com/benro-polaris-review/
4. Apple App Store (nd), Eclipse Guide:Solar Eclipse'23. Retrieved from https://apps.apple.com/us/app/eclipse-guide-solar-eclipse23/id1445813795
5. Thousand Oaks Optical (nd), Solar Filters ("White Light"). Retrieved from https://thousandoaksoptical.com/products/solar-filters/
6. Mark Bohrer (August 31, 2017), The Best Outdoor Party - Eclipse! Retrieved from https://www.activelightphotography.com/the-best-outdoor-party-eclipse
